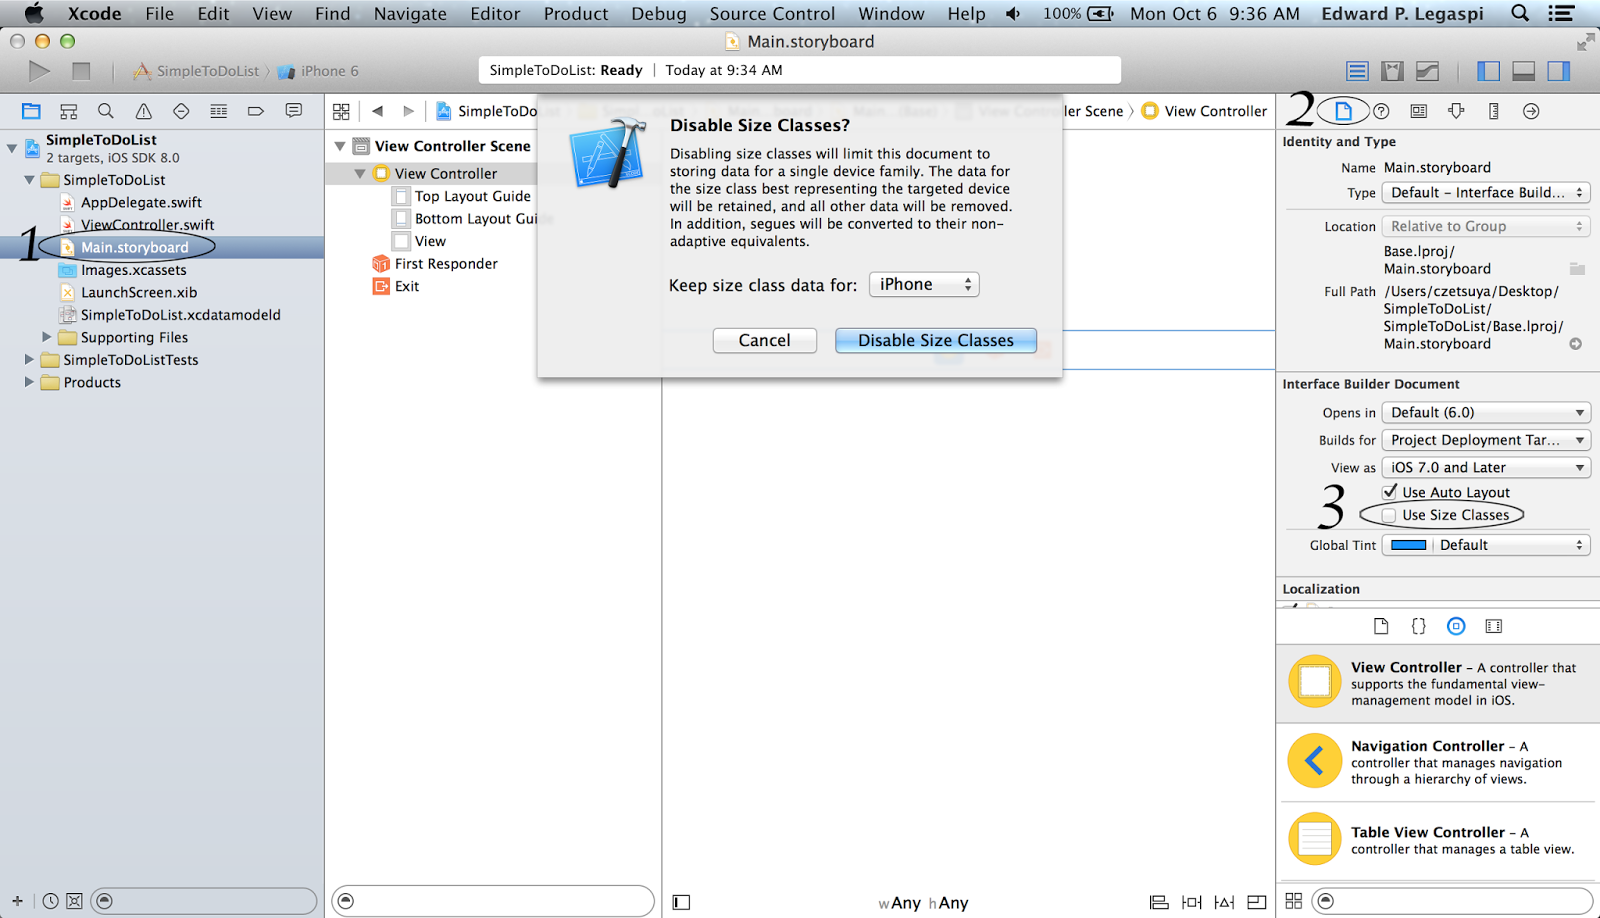
1.) First, for us to bring a improve view, nosotros bring to disable the size classes. Go to the "Main.storyboard" as well as click the file inspector. Below you lot tin run across checkbox for "Use Size Classes" as well as from there, you lot tin disable it.
2.) Next nosotros bring to embed the "ViewController" within a Navigation Controller. Inside the "Storyboard" click the "ViewController" as well as become to "Editor" -> "Embed In" -> "Navigation Controller". The "ViewController" must straight off bring a "Navigation Bar".

3.) Next nosotros bring to add together a "Bar Button Item" within the navigation bar. From the "Object Library", catch a "Bar Button Item" as well as drag it within the correct corner of the navigation bar. From the "Attribute Inspector", alter the "Identifier" to add.
4.) Next nosotros bring to add together roughly other "ViewController". From the "Object Library drag a "ViewController" within the storyboard. Next nosotros bring to connect the start sentiment controller to the instant sentiment controller. Click the bar clitoris exceptional of the start sentiment controller as well as agree the command cardinal as well as drag it to the instant sentiment controller. Influenza A virus subtype H5N1 pop-up should look as well as click "push".

5.) Now amongst the instant sentiment controller, add together a bar clitoris exceptional on the left side the of the navigation bar as well as alter the identifier to "cancel". Repeat the same procedure for the "done" clitoris except that it should hold upward on the correct side. Next nosotros bring to add together a textfield where nosotros tin move into our task, drag a textfield within the sentiment controller exactly below the navigation bar. Stretch it from the left margin to the correct margin.

6.) The instant sentiment controller doesn't bring a bird yet, as well as thence become to "File" -> "New" -> "File" as well as exercise a novel bird named "AddViewController". We bring to laid it equally the bird of the instant sentiment controller, as well as thence within the storyboard click the instant sentiment controller as well as become to "Identity Inspector" as well as laid the bird to "AddViewController".
7.) We tin straight off brand an activity for the "cancel" button. Inside the instant sentiment controller, click the "cancel" clitoris as well as agree downwardly the command cardinal as well as drag it within the "AddViewController" class. Fill upward the next information like below:


Repeat the same procedure for the textfield, lift it "txtField_desc".
8.) To hold upward able to become dorsum to the start sentiment controller from the instant sentiment controller, nosotros bring to popular the instant sentiment controller. Inside the portion "btn_cancel" that we've exactly added, add together this describe of code:
navigationController?.popViewControllerAnimated(true)
9.) Now amongst the "done" button, nosotros bring to connect it to the start sentiment controller, silent nosotros should start bring an "anchor point" from the start sentiment controller. So within the start sentiment controller, add together this describe of code:
@IBAction func unwindToFirstViewController(segue: UIStoryboardSegue) { } Now nosotros tin connect the instant sentiment controller to it, click the "done" clitoris as well as agree downwardly the command cardinal as well as drag it to the "exit" clitoris as well as direct the "unwindToFirstViewController".

If you lot drive to run the app from this point, you lot tin straight off become back-and-forth from the start sentiment controller to the instant sentiment controller.
Again, here's the set-up from step-1 to step-9
10.) Adding the data. Inside the instant sentiment controller class, import "CoreData" as well as insert this describe of codes:
override func prepareForSegue(segue: UIStoryboardSegue, sender: AnyObject?) { var appDel : AppDelegate = (UIApplication.sharedApplication().delegate equally AppDelegate) var context : NSManagedObjectContext = appDel.managedObjectContext! var newTask = NSEntityDescription.insertNewObjectForEntityForName("Task", inManagedObjectContext: context) equally NSManagedObject newTask.setValue(txtField_desc.text equally String, forKey: "desc") var fault : NSError? context.save(&error) println(newTask) println("Object saved") } 11.) Showing the contents of the data. We demand a tabular array sentiment where nosotros position a cell, within the storyboard, drag a tabular array sentiment to the start sentiment controller.
Next nosotros bring to add together a prison theatre cellular telephone where nosotros tin display the describe description, drag a unmarried tabular array sentiment prison theatre cellular telephone within the tabular array sentiment as well as alter its identifier to "cell".
Next nosotros bring to connect the tabular array sentiment datasource as well as delegate to the instant sentiment controller, correct click the tabular array sentiment as well as within the circle side past times side to the information source, agree the command cardinal as well as drag it to the sentiment controller. Repeat the same procedure for the delegate.
(See icon below)
Next brand an outlet of the tabular array view, like to textfield, exactly control-drag the tabular array sentiment to its bird as well as lift it "tableView"

12.) Inside the start sentiment controller class, import "CoreData". Then nosotros demand an array where nosotros tin shop temporarily our data.
var taskList : [String] = []
Next, nosotros demand the tabular array sentiment to display our information as well as thence insert this describe of codes:
func loadData(){ println("loading data... delight wait...") var appDel = UIApplication.sharedApplication().delegate equally AppDelegate var context = appDel.managedObjectContext var fault : NSError? var asking = NSFetchRequest(entityName: "Task") request.returnsObjectsAsFaults = faux var results : NSArray = context!.executeFetchRequest(request, error: &error)! equally NSArray if results.count > 0 { for res inwards results{ taskList += [res.valueForKey("desc") equally String] } }else{ println("no information loaded") } } func numberOfSectionsInTableView(tableView:UITableView!)->Int { provide 1 } func tableView(tableView: UITableView!, numberOfRowsInSection section: Int) -> Int { provide taskList.count; } func tableView(tableView: UITableView!, cellForRowAtIndexPath indexPath: NSIndexPath!) -> UITableViewCell! { allow cell:UITableViewCell = UITableViewCell(style:UITableViewCellStyle.Default, reuseIdentifier:"cell") cell.textLabel?.text = taskList[indexPath.row] provide prison theatre cellular telephone } func tableView(tableView: UITableView!, didSelectRowAtIndexPath indexPath: NSIndexPath!) { println("You selected prison theatre cellular telephone #\(indexPath.row)!") } Next, for our information to load, nosotros bring to invoke it within the "viewDidLoad" function, within the portion "viewDidLoad" insert this describe of code:
loadData()
Finally, when the user exactly move into a task, nosotros bring to reload the data. So within the "unwindToFirstViewControlller" function, insert this describe of codes:
taskList.removeAll(keepCapacity: false) loadData() tableView.reloadData()
Try to run the app as well as you lot should bring straight off a working uncomplicated to-do app :)
Here's the in conclusion code.
0 komentar:
Please comment if there are any that need to be asked.